Contents[hide] |
What This Process Does
- Creates journal entries for the selected fiscal year and selected Journal ID.
- When the entry is saved, the undistributed amounts in the account masters in Financial Management are updated.
- The journal entry's Process Status box will be checked on source user verified.
Next Steps
- After Adding a Journal Entry, it will need to be distributed. Follow Journal Entry Distribution.
- After Distributing a Journal Entry, it will need to be posted. Follow Post Activity.
Requirements
- Account Masters and Year Masters - the Account Masters and Account Year Masters must exist and be active in order to save a Journal Entry.
Add Journal Entries
- Finance → Financial Management → J/E Tab → Add Journal Entries
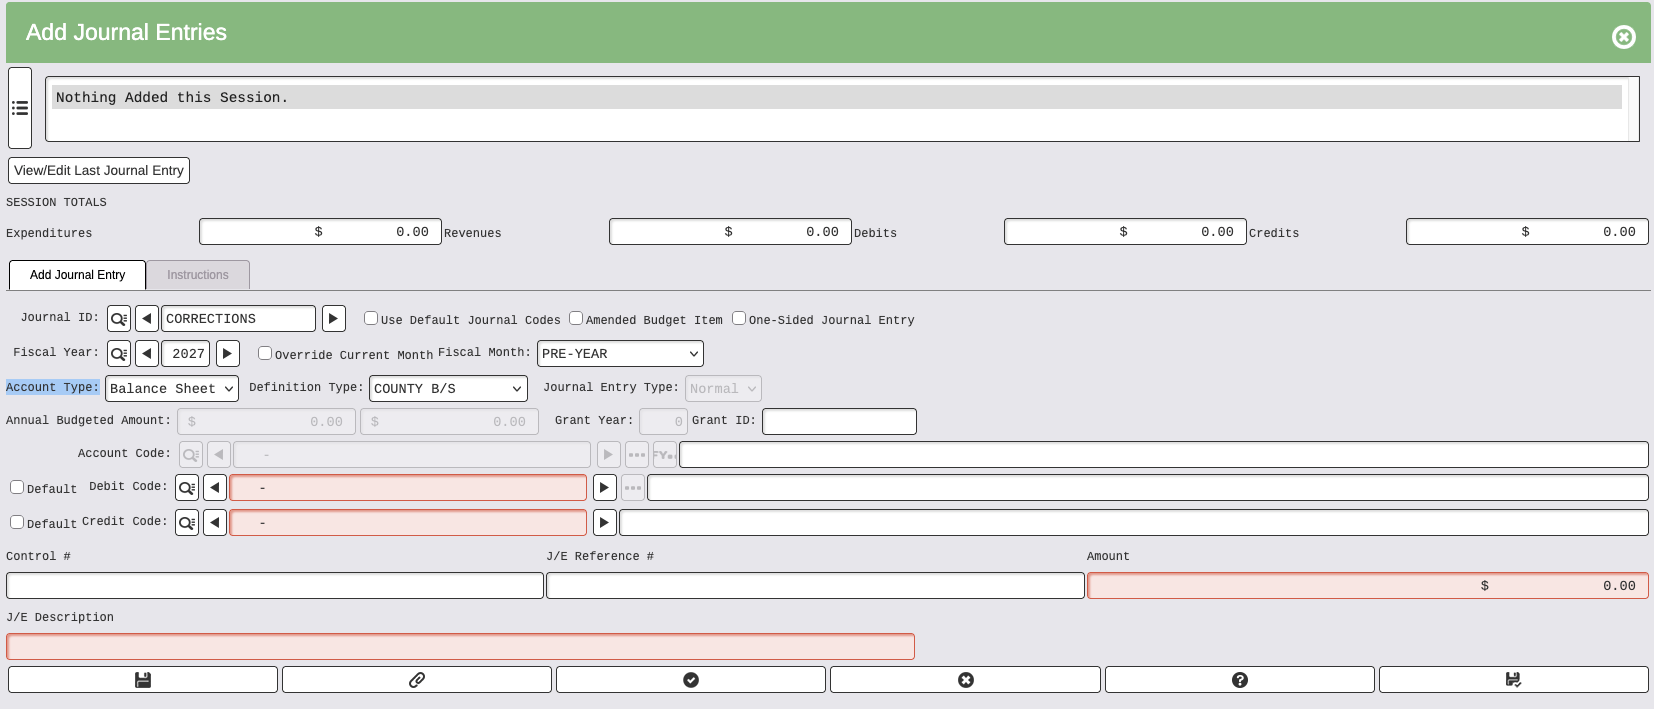
- Populate the appropriate fields accordingly. When complete, click Save.
- The Journal Entry Audit Trail Report generates.
- Either print the Audit Trail report or view it on the screen. Review for accuracy. Set your flags.
| FIELDS | Opt. | Rec. | Req. | Description |
|---|---|---|---|---|
| Journal ID | — | — | ♦ | Dependent on the purpose of the journal entry |
| Use Default Journal Codes | ♦ | — | — | When the journal ID's are set up, default journal codes can be setup with the ID's which will default to the journal entry accounting fields if this option is flagged |
| Amended Budget Item | — | — | — | This field will automatically be flagged if the Budget Amendments ID is chosen |
| One-Sided Journal Entry | — | — | — | If your account type is Balance Sheet, you must flag this field if you are making a one-sided entry |
| Fiscal Year | — | — | ♦ | Fiscal Year in which the journal entry will be posted; this defaults based on what year is set up as the fiscal year default |
| Override Current Fiscal Month | — | — | — | Flagging this field allows you to override the default fiscal month |
| Fiscal Month | — | — | ♦ | Fiscal Month in which the journal entry will be posted; if the override current fiscal month has been chosen, use the drop down menu to choose the month the entry will be posted to |
| Account Type | — | — | ♦ | The type of account that is being updated; Expenditures, Revenue or Balance Sheet |
| Journal Entry Type | — | — | ♦ | If account type is Expenditures, the journal entry type is:
If account type is Revenue, the journal entry type is:
It is not applicable to Balance Sheet entries |
| Annual Budgeted Amount | — | — | — | This is a display only field; if the Journal ID for Original Budget or Budget Amendment is chosen, the amount that is currently budgeted to that account will display |
| Account Code | — | — | ♦ | The account code the entry is updating |
| Debit Code | — | — | ♦ | Defaults based on the Account Type, Journal Entry Type and Account Code; if the entry is a revenue account type, the debit code default flag can be removed and another account number entered |
| Credit Code | — | — | ♦ | Defaults based on the Account Type, Journal Entry Type and Account Code; if the entry is a expenditure account type, the debit code default flag can be removed and another account number entered |
| Control # | ♦ | — | — | User defined ID number used for tracking entries |
| J/E Reference # | — | — | — | Used to associate the journal entry back to the source document |
| Amount | — | — | ♦ | Dollar value of the entry |
| J/E Description | ♦ | — | — | Used to describe the purpose of the entry |
| Affect Date | — | — | ♦ | This field will display if you have the affect date bundle; it defaults to the system date; it's main purpose is to allow the user to control when cash is affected |
| Opt. = Optional Rec. = Recommended Req. = Required | ||||
Notes
- As journal entries are added and saved, they will display at the top of the screen in the order they are entered during the session.
- The View Last Journal Entry allows you to view and make changes to the last journal entry that was saved during the session.
- The session totals will serve as running totals until you close out of your current data entry session.
- The standard JE will only allow a One-Sided Entry for Balance Account Type. If you change the Account Type to Balance Sheet, you should be able to select One-Sided Entry. If you are entering expense and revenue, just enter the expense or revenue code and the debit and credit will automatically populate. There is no need to do one-sided for expense and revenue.