This solution is describing how to export and import data in 4.0.
What This Process Does
- Allows to Export data from 4.0 to see how the data is currently set and can be used to build the import file
- Allows data to be imported into 4.0
- Does not follow the normal functionality of processes so every table/field would need to updated separately (i.e. Leave changes would need to be updated in the Leave Master, Leave Job and Leave Transactions separately)
- All files should be in .csv format
Define Infrastructure
System Administration → Utilities/Tools → Define Infracstructure → Files
Can be used to identify tables for each module and will display all fields with lengths for each file.
Select module from Library List on the left and File on the right. Then click on Select to view the maintain file.


Click on Key List fields and select to see the fields that make up the record. The Key Fields should be the first columns that make up the import file.

Imports/Exports
System Administration → Utilities/Tools → Define Processes → Import/Export
Choose the module on the left side and select the import or export definition on the right side based on what data needs to be exported or imported.


Explanation of fields on Maintain Import Export:
| Definition Name | Name of the Definition; Recommend to describe what table and Import or Export |
| Direction | Choose whether it's an Import or Export Definition |
| Ascii File | Enter the file name for the file that will be created. The name should end in .csv |
| Range Screen | Check this box when definition is created to add a range screen to the process |
| Make Range Screen | Check this box when definition is created to add a range screen to the process. Only have to check this once. When Definition screen is saved and closed. That box will show unchecked, but range sceen has been created. |
| Make Menu Definition | Check this box when definition is created to add menu definition to the process |
| Skip Duplicates | Do not use |
| Export Booleans as Integers | Do not use |
| Types | Should always be Field Record Delimited |
| Force Quotes | Check this box |
| CR | Check this box |
| LF | Check this box |
| Field Delimiter | Enter a comma (,) |
| Record Delimeter | Enter \r\n |
| Modules: Files: | The module and Fiel that was selected on the Define Import Export screen |
| Field Definitions | These are the columns of data that will be on the file. |
| +⬆︎ | Click on a field definition and use the up arrow to add a new field above the field selected |
| +⬇︎ | Click on a field definition and use the up arrow to add a new field below the field selected |
 | Select to view a field definition |
 | Delete field defintion |
| Auto Build Fields | Brings in all fields available for the table |
When adding a new field definition using the up arror or down arrow, the Maintain Import Export Field Screen will display.
Scroll down on the Fields Available section and select the field you want to add.
Leave the Format Type and click on Save. The new Field will be added to the Field Definitions. Click on Save on the Maintain Import Export Definition to save the change.

Import Export Defaults
There will be default Imports and Exports that will be available on every site and included in program updates. These defaults are listed below:
PAYROLL
DEDS DEFAULT-EX
DEDS DEFAULT-IM
EMPDED DEF -EX
EMPDED- DEF IM
DEFAULT JMST EX
DEFAULT JMST IM
PERSONNEL
DEMO DEFAULT-EX
DEMO DEFAULT-IM
Copy Existing Definition to Create a new Definition
An existing definition can be used to create a new definition and will inherit the existing set up. An example could be if you want to create a new import from an existing export, and you want the new import to match the columns of the existing export. Use this one below for example.

- Verify first that the Import Definition doesn't already exist
- Pull up the existing Export Definition
- Change the Definition Name to include export; For this example change to PAYDEDM-IMPORT
- Change the Direction to "Import to Datafile" by clicking on the dropdown arrow
- Click on Save at the bottom. This will create a new Import Definition and will inherit the setup.
Creating Import File
There are two methods to help in creating an import file.
1. If the data is already in the client site and needs to be changed, run an export file for the infomation needed to pull the current data and make necessary changes for importing.
2. Create a new file directly in Google Sheets with the required columns in the definition and populate the columns with the data that has been provided for import (i.e. files from client).
The recommendation is to use Google Sheets when creating a new import since it has less formatting issues than using Excel, but Excel can be used.
Create two tabs on the Google spreadsheet. Use one for the original data and the other for the new data that is being imported. This ensures that you always have a copy of the original data.
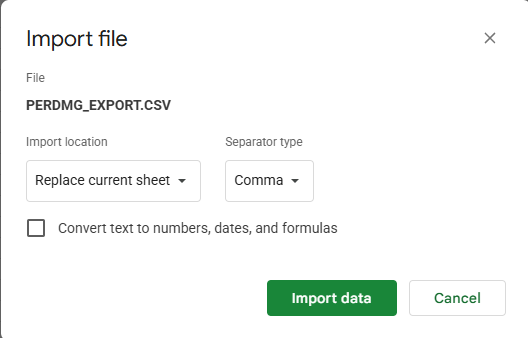
Upload Data to Google Sheets
- Click on File ➝ Import
- Click on Upload and browse for the file
- Select file in the file finder and click Open
- A window will open named Import File
- Choose Import location as Replace current sheet
- Choose Separator type as Comma
- Uncheck Convert text to numbers, dates, and formulas
- Click on Import Data
Download Import File
When the file is ready to download from Google Docs to import to a site:
- Delete all column headers
- Copy first row, insert a blank row below the first record and paste into the new row
- Copy last row and paste into the next row below
- Make sure there are no blank columns, if there are delete those columns
- Click on File ➝ Download ➝ Comma Separated Values (.csv)
Import File to Client Site
Always import into the test directory first to ensure the import is correct and data is correct after import!!
Go to System Administration → Utilities/Tools → Define Processes → Import/Export
Choose module on left and Import on right
Click on Execute button at the bottom that is to the right of the Select button (The Execute button does not have an icon, but if you hover your mouse over it you will see Execute)
On the A-im-payets Import/export Range Screen click on Choose Files and select your import file
Click on Select to import. There is no audit or report, the data imports immediately.
Check site for accuracy